After you've downloaded the Odin Validator unitypackage from odininspector.com/download and imported it into your project, the validator should automatically start validating your assets and currently opened scenes using Odin's builtin validators and validation rules. This automatic background validation process is called Live Validation.
You will also notice a new scene widget that acts as a quick way to interact with the validator using its right-click context menu. It also shows the number of warnings and errors that were found during the last validation. Clicking on it will open the Odin Validator window. Alternatively, you can also open it by navigating to Tools > Odin > Validator.
![]()
![]()
![]()
![]()
![]()
![]()
The Validator Window can be pretty daunting if you're new to it since it has quite a few tabs, buttons, and dropdowns. Let's have a look at it and highlight its most important parts.

Clicking one of these buttons will start a validation process that executes all active validators and validation rules. If you are interested in how to create your own validators check out the links at the bottom of this page.
The Play button will scan all assets and open scenes in the background. This process usually runs automatically while you're working on your project, it's also known as Live Validation.
The Globe button will scan all assets and scenes including closed scenes. Unlike Live Validation this will not run in the background, instead it's going to open a small window containing a progress bar and present the validation results once it has finished validating everything.
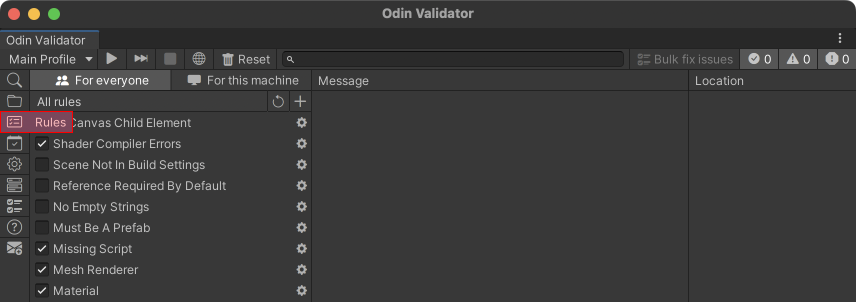
To see or change which assets will be scanned or which validation rules are active open the corresponding tab.
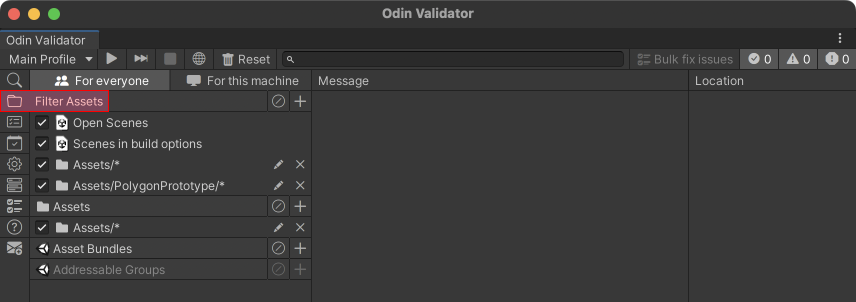

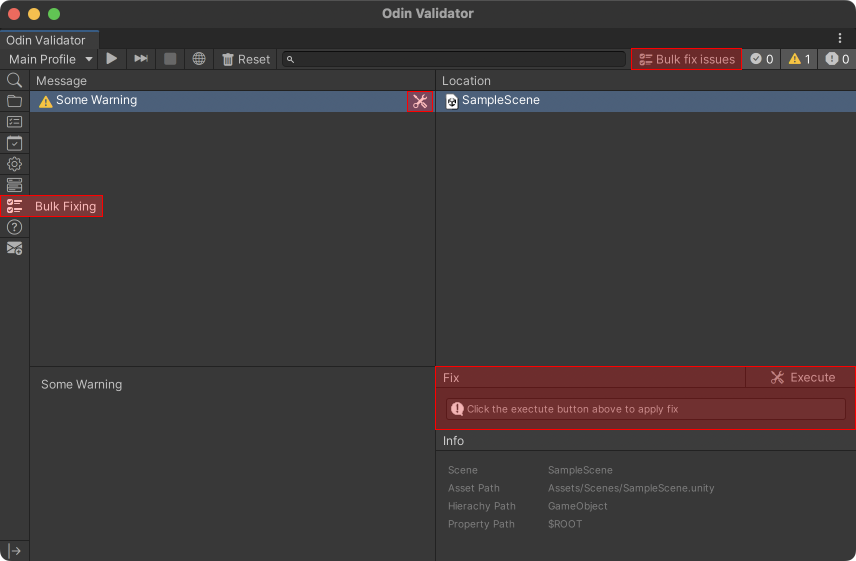
All found warnings and errors will be listed inside of the Validator Window along with additional information about the Location, Asset Path, Hierarchy Path, Property Path, and in which Scene it was detected. You can filter the shown validation results by
Some validation results offer an executable fix which can be identified by the wrench icon. If you select an entry with a fix you can see a fix menu in the bottom right corner which includes an execute button and depending on the fix can also have arguments that need to be set in order to execute the fix. The bulk fixing feature lets you execute a fix for one or more entries at the same time. It can be activated by clicking the "Bulk fix issues" button in the top right corner or by selecting the "Bulk Fixing" tab. You can learn more about how to add fixes to your validators by visting the corresponding link at the bottom if this page.
That should be all you need to know to get started using Odin Validator.
Checkout these links to other tutorials where you will learn how to create your own Validators, Validation Rules, and Fixes.
If you want to learn more about custom validators, check out this overview.
Validator Types OverviewYou already know how to create custom validators and are interested in the difference between Validators and Validation Rules? Then this tutorial is right for you.
Validators vs Validation RulesYou want to add a button to your validator that executes a custom fix? Then this tutorial is right for you.
Creating Custom Fixes Rider just got built-in support for Odin Inspector